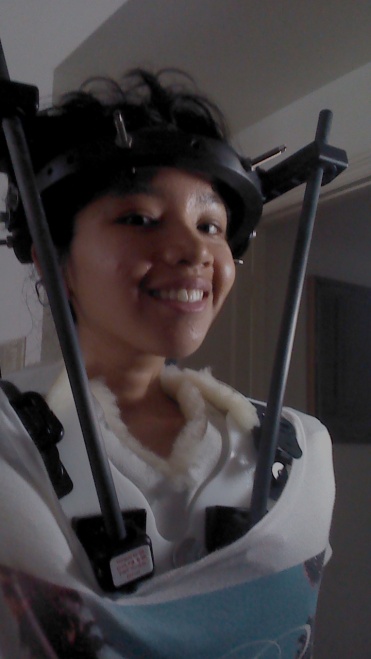
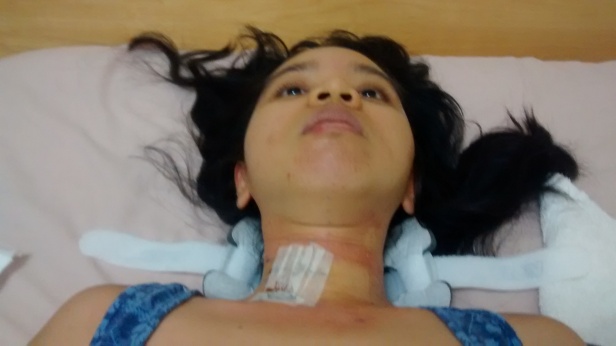
Keeping my head and neck as still as possible was extremely important for my cervical vertebrae and ligaments to heal properly after Surgery No. 2 back in September 2015. Enter Neck Brace No. 3 – my Aspen Vista collar.
The Aspen collar is plastic with front and back panels lined with removable padding. It provides comfort and keeps sweat away from your skin. Openings on the front and back panel of the collar allow your skin to breathe. (Source: University of Virginia Health System)

Despite having to wear it 24/7 for the next three months (removing it only after I showered), I spent a rather productive and fun time in that neck brace.


For one thing, I enjoyed relatively more freedom and felt more confident going out in public compared to when I wore that horrid halo brace and awkward Minerva jacket.
Honestly, I still feel so disturbed knowing that I endured that halo for three and a half months.
The Minerva jacket wasn’t so bad as I wore it only for a month… the worst part was just sleeping in it.
Oh, what joy to reminisce about the neck brace days.
But I digress. Let me share the nitty-gritty about how I dealt with having foam around my neck at all hours of the day. Sure, it sucked, but it was peanuts compared to my previous neck braces.
The various aspects of living with the Aspen collar
Head/neck movement
While the halo kept my head and neck 100% immobile (recall that it was physically screwed into my skull… ugh), the Minerva jacket allowed for several degrees of movement. I was surprised to feel that the Aspen collar, despite it being much smaller and lighter than the Minerva jacket (no thoracic component), didn’t allow for much movement at all. I estimate perhaps a window of less than 5º of movement in flexion or extension of the neck, and barely any in all other directions (lateral and rotary).
It may look flimsy but it controlled my neck movement so much better than the Minerva jacket. I wish my neurosurgeon just gave me the Aspen collar to wear after my halo (note to self: write a letter to Minerva jacket manufacturer TruLife about this!).
Application
The initial application was done during my surgery and since I was obviously asleep then, I have no idea how they did it. I came in to the surgery wearing my Minerva jacket:

And then poof!

Waking up post-surgery with the Aspen collar was bizarre. After wearing padding against my torso for so long, it was the first time I felt my real back against a bed in four and a half months!
I’ll come back to how I removed and put it back on a bit later.
Cost
I honestly don’t know how much the collar cost, since all my medical costs were covered by public health insurance in Ontario, Canada. On Amazon, a set with the collar and replacement pads costs $55 USD.
Skin care, hair care, and brace reapplication
Did I mention this was my favourite part of my neck brace life?
Ha. Right.
To refresh your memory, here was my skin and hair care regimen while in the halo brace:
- Shower waist down only (with a removable shower head)
- Wipe my neck and upper body with baby wipes
- Wash my hair using buckets
Visual:
In the Minerva jacket:
- Remove all padding that could be removed (those attached with Velcro straps)
- Cover padding/straps with Saran wrap and tape if possible
- Shower fully (that first complete shower after three and a half months felt LIBERATING)
- Dry myself for AN HOUR using a hair dryer
- Put padding back on
- Remain damp for half the day
Sigh. This process was so taxing that I had to cut my hair so drying wouldn’t take so long… but it still did.
Now, this is what I did whenever I showered with my Aspen collar (my neurosurgeon told me to keep it on as I could easily trip or fall in the shower). I didn’t make all these steps up; I was instructed by the nursing staff on how to do this before I was discharged from the hospital.
- Have WASHED and DRIED replacement pads ready (more on this later)
- Shower head to toe
- Dry myself with a towel; press foam pads against towel to get as much water out as possible
- Dry my hair using a hair dryer
- Call my mom/husband to help me
- Sit down
- Remove the collar with the Velcro straps
- Keep my head up and avoid moving my neck (I usually stretched my painful shoulders and raised my arms up during this time)
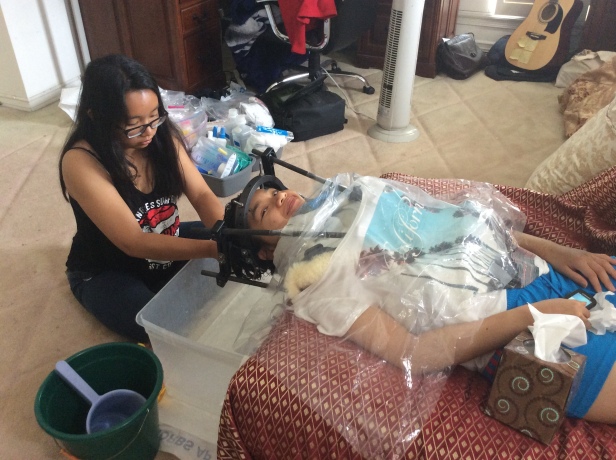
Then, this is what my mom/husband did. Basically, she/he positioned the collar on me while I was sitting and then adjusted it properly while I was lying on the bed. I never adjusted the collar while seated or standing as it was too loose. From my experience, lying on the bed ensures that the neck is in the proper position and allows for a tighter fit of the collar.
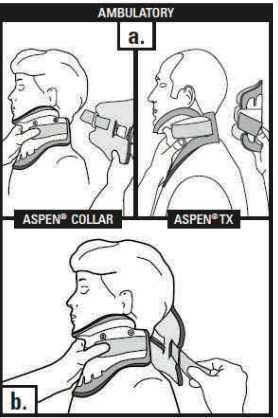
Positioning the collar (ambulatory – sitting or standing):
- Remove the foam padding from the plastic part of the collar and set aside for washing later
- Wiped the plastic part of the collar with a towel (I did it myself sometimes… WHILE NOT MOVING MY NECK!)
- Attach and insert the replacement pads into the collar (more on this later)
- Place the front part of the collar on my neck (chin piece directly under the chin)
- Place the back part behind my neck
- Strap both parts together with the Velcro straps
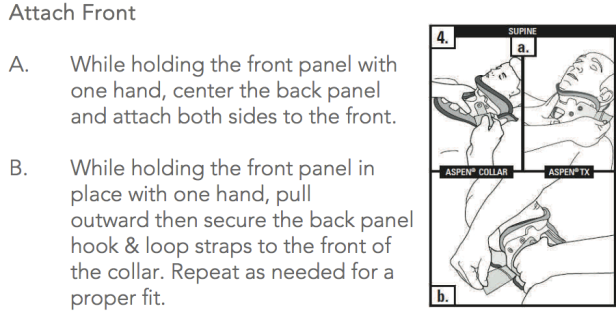
Adjusting the collar (supine):
- Have me lie ON THE BED (BY LOG ROLLING ONLY)
- Adjust the position of the collar (for example, the sides of the front part must be tucked into the back part)
- Strap both parts together TIGHTLY
- Have me get up and check the fit in front of a mirror (see below)
- Adjust the collar and the straps WHILE I LIE ON THE BED if necessary
Our “neck brace removal sessions” were literally the only opportunities I had to let my neck breathe for a few minutes. I wiped my own damp neck while my mom/husband would insert the replacement pads into the collar.
Okay, so here is a video that can help y’all visualize this:
The main difference between what I actually did in real life vs. this instructional video: I NEVER (EVER, EVER, EVER) adjusted the circular dial to change the neck height. Like I mentioned earlier, this was done for me initially during my surgery. I was too scared to change it and I don’t think I was supposed to.
So did I actually fully shower everyday like a normal human being, even if I had to deal with these Shower Procedures? Well… nope! Luckily my husband and I have a removable shower head so I could skip washing my hair for a few days (and thus, dealing with a wet neck brace) but still remain clean. But after two or three days when my hair would tell me Hey, it’s time to wash me, I would have to face the inevitable.
I didn’t remove the collar when I washed my face in the morning and before going to bed nor when I brushed my teeth. Like what I did while wearing the Minerva jacket, I simply inserted a small face towel between my chin and collar to absorb any water coming down my face.
General fit
I kept my collar on and properly tightened at all times (except when we had to replace the pads, obviously). Here are the guidelines I used to make sure that the fit was just right:
- My chin was centred in the chin piece, with it being flush to the front of the plastic
- I can swallow
- No plastic was touching any part of the skin (especially the piece of plastic positioned near the throat)
- My head was not wobbling around
- There was not much space between my chin and the chin pad:

I had to tighten it (i.e., just adjust the Velcro straps with my husband’s help) every two days or so. I think it becomes a little loose while I sleep.
More about caring for the Aspen collar
According to opcare UK:
Keeping your Aspen Vista Cervical Collar and the skin beneath it clean is a very important part of your treatment. Proper cleaning will help prevent rashes and skin irritation.
I was discharged from the hospital WITHOUT an extra set of replacement pads. When I called the nursing station on my floor, they honestly didn’t have a clue where I could get extra ones and why I didn’t receive any in the first place.
I didn’t want to buy it myself (retails for $60 CAD) so I just waited until my follow-up appointment to see if there were any hanging around in the Orthopaedic Clinic. Luckily they had a set lying around! Never mind that my pads weren’t washed for three weeks. Huuu.
Here are the instructions that came with the replacement pads:
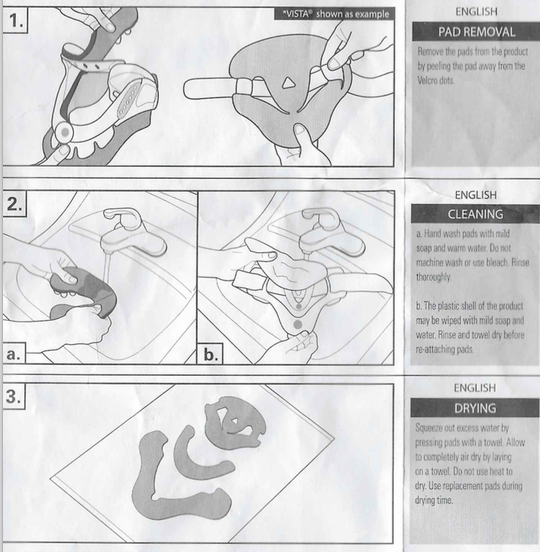
Removing the replacement pads
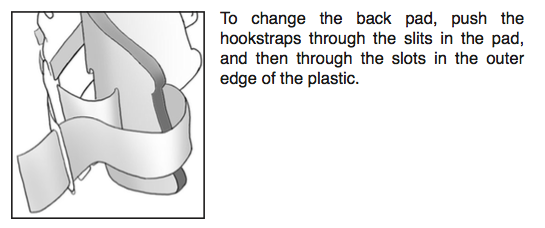
For the front part, you literally just remove the foam pads which are attached by Velcro. As for the back part, this manual from Aspen Medical Products does a pretty good job of explaining how to do it:
Washing and drying
All the manuals out there say to just HAND WASH the replacement pads with mild soap and water. I washed the pads using Cetaphil, my own gentle facial cleanser, in our bathroom sink and squeezed any extra water out of them after.
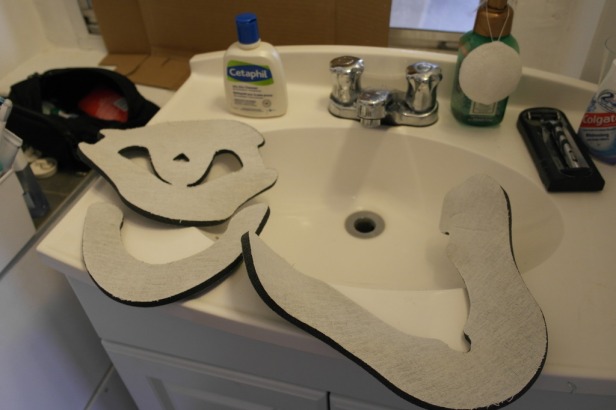
Although all the manuals also say to NEVER PUT THE PADS IN THE DRYER, I did. Hehe. I just put it on the low heat setting. The proper way is to leave them air dry overnight.
Inserting the replacement pads
I never did it myself, but my mom and husband said it was simple enough. Just do the opposite of when you take it off.
Despite all this washing and cleaning of the pads, I continued to develop this irritating, prickly skin rash from my collar (it started forming when I had my Minerva jacket).
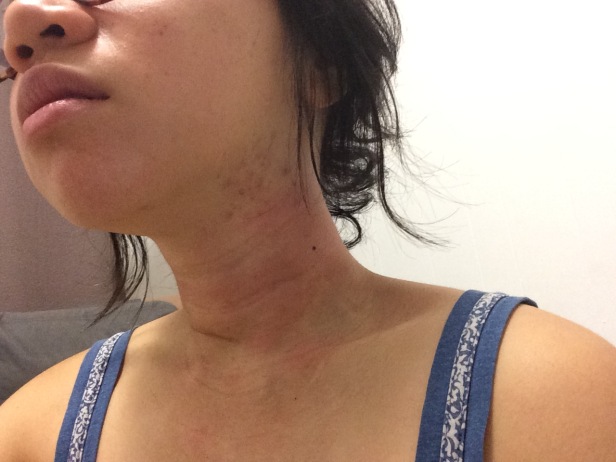
Now that I have my collar off, I am applying Triaderm 0.1% on it, a cream my doctor prescribed me. It’s not really noticeable now.
Pain management
My shoulder area bothered me a lot. I needed to lie on the bed at least once a day just to rest them. Raising my arms while on the bed usually made me feel better. I took Tylenol when needed, but it was not very often. I went for massages maybe only twice in three months – I wanted to go for more but I didn’t want to spend any more money on them.
I experienced aching, and at times sharp, pain in my neck from time to time. It hurt to yawn, as it engaged my tight neck muscles. Sometimes it hurt when I inadvertently took a huge step on the street. I heard some crackling ligament noises in my neck lying in bed on my back, perhaps once a week.
Everyday life in the Aspen collar
I carried on with my life, really making the best of it by learning and improving on my French and cooking. The only things I could not do were:
- Fall
- Lift anything more than five pounds
- Go back to work at the mine (my neurosurgeon said I would be fine to work in an office setting in Toronto if I did have a job there)
- Do any form of physical exercise except walk (I luckily moved to a very walkable city)
- Walk on the street by myself (a stupid rule my husband enforced… since I can’t turn my head and react quickly enough to cross the street or to defend myself from hobos that may harass me)
Other nuisances included having to tuck a napkin between my chin and my collar every time I ate and carefully putting clothes on (wide-collared shirts or dresses were okay now). Since I moved back to our apartment after my surgery, away from the hospitality of my parents, I had to become a real adult again and do *drum roll please* chores.

Sleeping in the collar was not bad at all. It was actually quite comfortable. I slept on my side 95% of the time.
Aspen collar manuals and guides
The following details how to fit, clean, and re-apply the collar, but it is important to note that I myself re-applied my collar in a supine position and put my replacement pads in the dryer.
- Aspen Medical Products (standard instructions)
- Chaneco UK (standard instructions with great diagrams)
- opcare UK (very detailed instructions)
- University of Virginia Health System (some information about daily activities)
In retrospect, my time in the Aspen collar was not so bad. I’m just glad it’s all over! To anyone who is currently wearing or slated to wear an Aspen collar as part of your treatment, I wish you all the best. You can do it!


I d love to know how you slept I it. I’ve tried every position and it so uncomfortable. Even on my side
LikeLiked by 1 person
I slept on my side nearly all the time. I used a pillow like one would normally. I did, however, put my hand on the side of my face. I think I did that to elevate my face a little bit in order to be at the same level as the rest of my head in the collar. It would be like this, but with the other hand:

I didn’t find sleeping so bad. Maybe I got used to it.
Thanks for stopping by 🙂
LikeLike
Thank you, Rose!
LikeLike
Thank you for this blog! The health care people here told me nothing about the ins and outs of the Aspen collar. I found this blog really informative and super useful.
LikeLiked by 1 person
You’re most welcome! I’m glad I could shed some light on something you have to wear for a significant amount of time! All the best to your recovery.
LikeLike
Thank you for your informative blog! My 11 year old son has 2 spinal fractures and has required the Aspen collar for 24 hrs/day for 3 months. I have referenced this blog numerous times! We are hoping to part ways with the Aspen at the end of the month. Thank you & hope you are doing well! 🙂
LikeLike
You’re very welcome! All the best to you and to your son’s recovery!
LikeLike
Thanks for your blog, I am one week into 6-12 weeks in an aspen brace that comes right down around my chest after fracturing C1. Just nice to have some info that is not just the pure medical stuff.
LikeLike
Thanks for sharing! Having just recovered from a C5 teardrop, C6/7 compression fracture, I wish I would have found your site sooner. I’m inspired by your positivity. Amazing that you had a full recovery!
For future visitors, I found it really helpful to have 2 Aspen collars, and several sets of pads. You can wash the pads in the washing machine on gentle cycle, but make sure not to wash them with other items. Also found that an easy way to swap out the collars is to leave the velcro attached on one side, slide the collar in place under your chin, and then attach the other side. I would also recommend getting a hard plastic collar for showering. It is more on/off; however, it made life a whole lot easier (link below)
For sleeping, I found setting up a recliner like position in the bed with pillows tucked under my arms and head to be very helpful.
https://www.mtrsuperstore.com/products/philadelphia-tracheotomy-cervical-collar?variant=835596213&utm_source=google&utm_medium=cpc&scid=scplpshopify_US_238769409_835596213&sc_intid=shopify_US_238769409_835596213&gclid=Cj0KEQjw0IvIBRDF0Yzq4qGE4IwBEiQATMQlMaR0fpgRLxLDxs9BgjlS5cEENPWUpaBBRgWG-1lfo-waAuW-8P8HAQ
LikeLike
Thank you! My wife came home from the hospital yesterday (C-1 fracture). Received no instructions about what to do to keep my wife clean and “comfortable.” While waiting for the doctor to return my call I discovered your post. Very helpful.
LikeLike
No problem. I wish your wife a speedy recovery!
LikeLike
Hi dpleblanc!
Congratulations on your amazing recovery!
Nothing in comparison to your trauma but last week I had an ACDF (C5-C6). I didn’t feel the doctor, P.A. or recovery staff fully explained how to assemble, use or understand the goals in using the collar.
Fortunately, I came across your article and every question I had was answered with knowledge and experience.
It is so well-written, upbeat and humorous, thank you so much for sharing!
LikeLike
You’re so welcome! I’m glad to help. Wishing you all the best in your recovery.
LikeLike
Thanks for writing the ins and outs of the collar! I have a very similar collar, and I bookmarked this page when i was first fitted for it. I’m sliding into month three of the collar (and it’s probably going to stay on for a couple more months after surgery,) and this has provided me invaluable help in knowing that I had to readjust it every couple days or so.
Thank you so much for bringing levity to an otherwise bleh situation!
LikeLike
Thank you so much for sharing your situation and all the practical knowledge you gained from your trauma. I had requested help with the brace from the hospital because it was too loose and was throwing my head forward but was told it was okay. It wasn’t until I started doing research and came across your blog that I actually got the information I needed to stay safe and feel less anxious that I’m actually hurting my neck by wearing the brace improperly. Thank you so much! Your words were invaluable! So happy for you that you made a full recovery!
LikeLike
So sorry for what happened to you, hope all is well for you. I enjoyed your blog, so informational and helpful. I happen to be wearing an Aspen Collar myself and going to try sleeping in a reclinner. Great blog! Happy New Years!
– Colton
LikeLike
Two days ago I fractured C1, learned about it after a CAT Scan yesterday and was fitted an Aspen Vista brace. I do not feel very comfortable in it, just can stand it with the knowledge what would happen if I do not wear it. 🙂 I have a huge problem in that I am claustrophobic and following the instructions to lie flat on my bed gives me panic attacks; reinforced by the fact that I can’t stand up alone from the bed!! 😦 I tried to do exactly as you show so beautifully: legs bending and down and then pushing up with my elbow/s. Well, I do not know if my aged physical state [am 82 years old] prevent me from being able to get up!? Or why this is. Slept last night sitting up in a wing chair. Of course, only now and then nodding of. – If you have a suggestion, I certainly would appreciate it.
Enjoyed your wonderfully written up ‘story’ with the various beck braces very much. THANK YOU!!!
LikeLike
Hello
My Wife wears an Aspen Vista collar for a neck fracture, but due to the seriousness of her condition, the neck will never likely heal, so it’s for Life.
Issues we have
1-the side foam pad is too high below the ear and when sitting actually pushes against her ears, have decided to cut off a 1/4” strip along this edge, which helps
2-the back foam pad has a similar problem with her ears and a small radial trim of 1/4” resolved this.
3-the newer pads seem much rougher, particularly the edges, akin y sandpaper, the suppliers say specs not changed, but maybe manufacturer is using cheaper material
4- tried washing in very weak LUX soap flakes then weak fabric conditioner, but no improvement…..then tried plain water and dry in airing cupboard again no improvement….then soaked in fabric conditioner for 5 minutes, was softer.
Going to try tumble dryer idea and see how that goes.
LikeLike
Just so everyone knows, the aspen collar pads are available FREE from the NHS , we visit our NHS hospital every 6-8 weeks and get two sets, our DR had no idea this could be done, he tried prescribing them, but the chemist had no arrangement with the supplier, took quite a while to find out they could be had free from the NHS, keep persevering….
LikeLike
Hello
There are problems with some of the links
Link broken
Click to access Aspen%20Collar.pdf
Opcare New link
https://www.opcare.co.uk/wp-admin/admin-ajax.php?juwpfisadmin=false&action=wpfd&task=file.download&wpfd_category_id=1113&wpfd_file_id=6754
Link broken
http://www.virginia.edu/content/404
Aspen New Lunk
Click to access aspen-vista-pd-collar-sizing-chart.pdf
LikeLike
I’ve had road traffic accident wearing aspen collar 24 /7 for the past 2 months got to wear it further 4 weeks day n night maybe after that just wear it when go out till neurosurgeon say I don’t have to it image c2 unstable fracture very sore
LikeLike
Thank you for this very informative blog. I too did not receive any information when I left hospital, but I found your blog the first day, promptly requested spare pads ( they gave me a whole new brace) so I’m able to swap them about. I have been able to wash my hair ! I have another 12 weeks and I’ve already revisited your blog a couple of times to remind myself of other aspects. Thank you for you upbeat journal! Invaluable x
LikeLike
Hey there would you mind sharing which blog platform you’re working with? I’m planning to start my own blog soon but I’m having a hard time choosing between BlogEngine/Wordpress/B2evolution and Drupal. The reason I ask is because your design seems different then most blogs and I’m looking for something completely unique. P.S Apologies for being off-topic but I had to ask!
LikeLike
I use WordPress!
LikeLike